OAuth without Xamarin.Auth

When you write enterprise mobile applications you’re always confronted with authentication. There are a lot of examples that show you how you can authorize the user with Facebook. I don’t know about other countries, but in Belgium enterprise companies don’t let you login on their corporate environment with your Facebook account. You can use Xamarin.Auth for authorization with other services than Facebook, but if the authorization flow is a bit different, you can’t use it anymore.
What about ADAL and MSAL?
Microsoft create 2 libs you can use for mobile OAuth 2.0: ADAL (Azure Active Directory Authentication Libraries) and their new library MSAL (Microsoft Authentication Library). The libraries have been in alpha like forever. It doesn’t mean that they don’t work (Google mail has been in beta for what? a decade?), but as with Xamarin.Auth, you can’t use them to authorize all services. I needed to authorize with VSTS, but couldn’t get it to work.
An OAuth lib that always works
OAuth makes use of web requests to do its thing. So Xamarin.Auth, ADAL, MSAL are all creating an url with the data you provide them and they send the web request to the server.
Identitymodel
Identitymodel is a library that can work with your PCL and makes the authorization request and response quite easy. The library was made by Dominick Baier and Brock Allen (the same guys that created IdentityServer). The library also contains the necessary classes for your token request. For some services (like VSTS) you need to add additional data in the request which you can do with Identitymodel.
Xamarin, OAuth 2.0, VSTS and Identitymodel
We’ll create a small app AuthDemo that requests an AccessToken to work with the VSTS API.
In their document Authorize access to REST APIs with OAuth 2.0 Microsoft describes how you can get started. In this blog I’ll describe just the topics we need for the mobile demo.
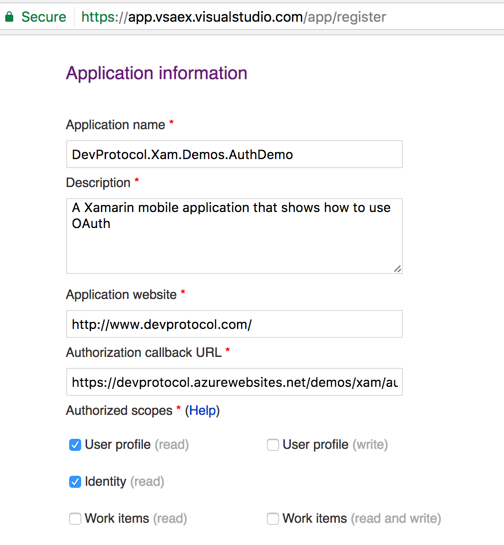
Register your app
You need to let VSTS know that you’ll create an app that will make use of the API and that your app needs the necessary permissions to act on behalf of the authorized user.
Go to https://app.vssps.visualstudio.com/app/register, login and register your app.
For AuthDemo I’ve used:
 Next you’ll get all the info you need to setup the Oauth 2.0 flow:
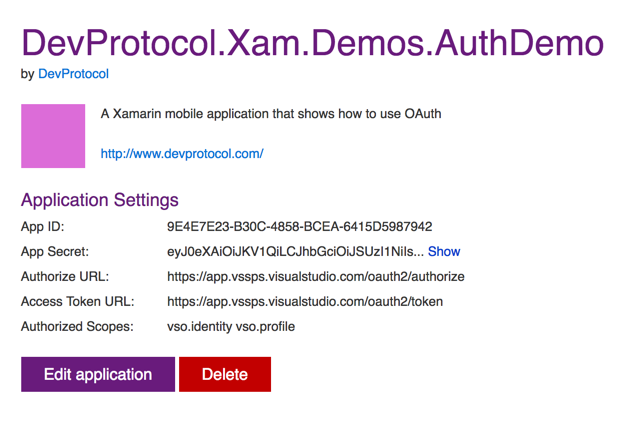
The configuration file
For your convenience you can place all the configuration information for OAuth in 1 file. All the information was gathered in the previous steps.
namespace DevProtocol.Xam.Demos.AuthDemo.Configuration
{
	public static class ApiKeys
	{
		public const string ClientId = "APP-ID-FROM-VSTS";
		public const string ClientSecret = "APP-SECRET-FROM-VSTS";
		public const string RedirectUrl = "YOUR-REDIRECT-URL";
		public const string Scope = "vso.identity vso.profile";
		public const string AuthorizeUrl = "https://app.vssps.visualstudio.com/oauth2/authorize";
		public const string AccessTokenUrl = "https://app.vssps.visualstudio.com/oauth2/token";
		public const string BaseAuthorizationUrl = "https://app.vssps.visualstudio.com/oauth2";
		public const string ApiVersion = "2.0";
		public const string AccessToken = "access_token";
	}
}
Adding Identitymodel
Identitymodel is quite up to date. As of version 2 they target netstandard 1.3. With Xamarin Studio we still can’t make netstandard libs (that will soon change). For now we’re still stuck with PCL. Make sure the profile of your PCL is set to Profile 78. Add the Identitymodel Nuget v1.13.1 to your PCL
Adding the view
The LoginPage.xaml is very simple. It contains just a WebView. The source of the webview is bound to our ViewModel. It’s a twoway binding so we can verify if our redirect url is called at the end of the authorization process:
<?xml version="1.0" encoding="UTF-8"?>
<ContentPage
    xmlns="http://xamarin.com/schemas/2014/forms"
    xmlns:x="http://schemas.microsoft.com/winfx/2009/xaml"
    x:Class="DevProtocol.Xam.Demos.AuthDemo.Pages.LoginPage">
    <ContentPage.Content>
        <WebView x:Name="webAuth"
            Source="{Binding AuthUrl, Mode=TwoWay}"
            HorizontalOptions="FillAndExpand"
            VerticalOptions="FillAndExpand" />
    </ContentPage.Content>
</ContentPage>
Get an Authorization Code
First we need an authorization code. In our viewmodel we’ll make use of the AuthorizeRequest (part of Identitymodel) to create the URL needed to request the authorization code. The AuthUrl is bound to our webview so if we set the authorization url in the constructor our webview will start working right away:
private string _currentCSRFToken;

public LoginViewModel()
{
    AuthUrl = CreateAuthUrl();
}

private UrlWebViewSource authUrl;
public UrlWebViewSource AuthUrl
{
    get { return authUrl; }
    set { SetProperty(ref authUrl, value); }
}

private UrlWebViewSource CreateAuthUrl()
{
    var result = new UrlWebViewSource();
    var authorizeRequest = new AuthorizeRequest(ApiKeys.AuthorizeUrl);

    var dic = new Dictionary<string, string>();
    dic.Add("client_id", ApiKeys.ClientId);
    dic.Add("response_type", "Assertion");
    dic.Add("scope", ApiKeys.Scope);
    dic.Add("redirect_uri", ApiKeys.RedirectUrl);
    _currentCSRFToken = Guid.NewGuid().ToString("N");
    dic.Add("state", _currentCSRFToken);
    result.Url = authorizeRequest.Create(dic);
    return result;
}
In the request I added the key response_type with value Assertion. If you read the Microsoft documentation you need to provide that parameter. The state key is added as CSRF token (Cross-Site Request Forgery Token) so we can verify if the callback is really a callback for the request we made. The other keys come from our configuration file.
Check the Redirect URL
Now we need to verify if the webview redirects towards our redirect url. As we bound the source of the webview, we can verify in our viewmodel if that property changed.
Change the constructor:
public LoginViewModel()
{
    AuthUrl = CreateAuthUrl();
    this.PropertyChanged += ViewModel_PropertyChanged;
}
Now you need to verify if the AuthUrl property was changed and if it matches with our RedirectUrl. Next create a AuthorizeResponse object (found in the Identitymodel lib) from the url we got back and verify the CSRFToken via the state property.
private async void ViewModel_PropertyChanged(object sender, System.ComponentModel.PropertyChangedEventArgs e)
{
    if (e.PropertyName == nameof(AuthUrl))
    {
        var url = AuthUrl.Url;
        if (url.Contains(ApiKeys.RedirectUrl))
        {
            var authorizeResponse = new AuthorizeResponse(url);
            var state = "";
            authorizeResponse.Values.TryGetValue("state", out state);
            if (state == _currentCSRFToken)
            {
                // Request Access Token
            }
            else
            {
                // Log CSRF token doesn't match.
            }
	        MessagingCenter.Send<LoginViewModel>(this, MessageKeys.NavigateToMain);
        }
    }
}
Request an access token
The last thing we need to do is use the authorization code from the authorizeResponse to request an access token. For that we’ll use the TokenClient class from identitymodel. We add all the necessary info via key/value pairs and send the request. Our tokens will come back in a tokenResponse object.
var keyValues = new Dictionary<string, string>();
                keyValues.Add("client_assertion_type", "urn:ietf:params:oauth:client-assertion-type:jwt-bearer");
                keyValues.Add("client_assertion", ApiKeys.ClientSecret);
                keyValues.Add("grant_type", "urn:ietf:params:oauth:grant-type:jwt-bearer");
                keyValues.Add("assertion", authorizeResponse.Code);
                keyValues.Add("redirect_uri", ApiKeys.RedirectUrl);

                var tokenclient = new TokenClient(ApiKeys.AccessTokenUrl);
                var tokenResponse = await tokenclient.RequestAsync(keyValues);

                App.User.AccessToken = tokenResponse.AccessToken;
                App.User.RefreshToken = tokenResponse.RefreshToken;
Close the webview
Now that we have our access and refresh token we can close our webview and navigate back towards our app.
Download
Download the code from my Github