Getting started with Xamarin Forms and ReactiveUI
I’ve been programming some Xamarin Forms apps. Setting up a good solution and structure your code isn’t always easy. The Xamarin frameworks are evolving fast and the setup you did some months ago suddenly doesn’t feel that appealing anymore. The way Xamarin.Forms handled navigation changed dramatically over time, the way they handle lists, supporting fragments for Android…
A few months ago I started learning Reactive Extensions. It took a while before I could get my head around. For the UI part you can use ReactiveUI. Rx and ReactiveUI play nicely together. The only thing I missed was a tutorial to get started with Xamarin Forms using ReactiveUI. I hope this tutorial will get you started with Rx and ReactiveUI. Keep in mind that Rx and ReactiveUI are not an all or nothing thing. You can add it to your apps where it feels right and before you know you’ll add more of it in your apps.
The app
The app is quite simple and looks like this:
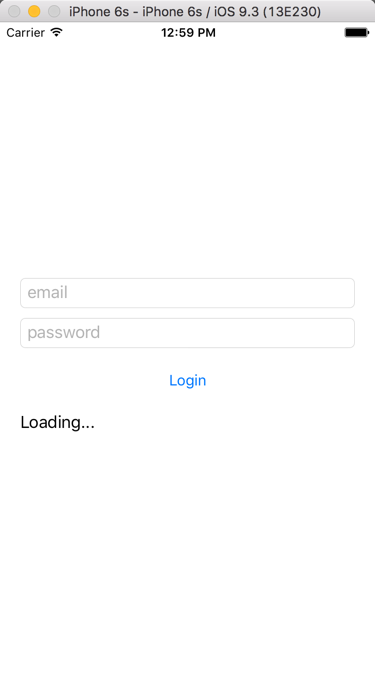
The logins screen has some basic functionalities:
- You can only click on the login button if an email address is provided and a password.
- While the login action is happening the “Loading…” label should appear and the email and password textboxes should be disabled.
Tutorial
Getting started
Create a new Xamarin Forms project ( in my case I named it DevProtocol.Xam.RuiDemo) using PCL and add the necessary NuGet packages to your projects.
- Update your Xamarin Forms NuGet packages (currently 2.3.0).
- Install the Reactive Extensions NuGet package. Currently they are migrating Rx to .NET Core. You can still add Rx to your project by using the version number. If you’re using Xamarin Studio you can’t request different versions of NuGet packages out of the box. However, you can install the Add-In “NuGet Package Management Extensions” which allows you to open up the “Package Console Extension” window via View -> Pads -> Package Console Extension. This window allows you to install packages with the commands you know:
Install-Package Rx-Main -Version 2.2.5
- Install the Splat NuGet package. Yes, it comes with ReactiveUI, but the wrong version is linked. If you first install Splat you won’t have the upgrade problems.
install-package splat
- Install ReactiveUI
install-package reactiveui-core
install-package reactiveui-xamforms
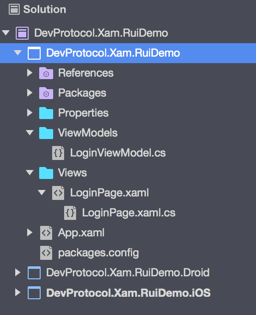
Structure your PCL
I’ve added some files and folders to structure the PCL. It looks like:
Start coding
Change your App.xaml.cs file to set the LoginPage as MainPage
public App()
{
  InitializeComponent();
  MainPage = new DevProtocol.Xam.RuiDemo.Views.LoginPage();
}
Open up the LoginPage.xaml file to add the layout:
<?xml version="1.0" encoding="UTF-8"?>
<ContentPage
  xmlns="http://xamarin.com/schemas/2014/forms"
  xmlns:x="http://schemas.microsoft.com/winfx/2009/xaml"
  x:Class="DevProtocol.Xam.RuiDemo.Views.LoginPage">
  <ContentPage.Content>
    <StackLayout HorizontalOptions="FillAndExpand" VerticalOptions="Center" Padding="20, 10" Spacing="10">
      <Entry x:Name="Email" Placeholder="email" />
      <Entry x:Name="Password" IsPassword="true" Placeholder="password" />
      <Button x:Name="Login" Text="Login" />
      <Label x:Name="Loading" Text="Loading..." />
    </StackLayout>
  </ContentPage.Content>
</ContentPage>
With ReactiveUI we’ll make use of MVVM. The bindings are not created in the xaml, but in the code behind file. The only thing we do in xaml is naming the controls we need.
In the code behind file (LoginPage.xaml.cs) we need to add some plumbing code that is always the same (you should refactor the code later on, but for now we’ll keep it simple) and add the bindings:
using System;
using System.Collections.Generic;
using ReactiveUI;
using Xamarin.Forms;
using DevProtocol.Xam.RuiDemo.ViewModels;

namespace DevProtocol.Xam.RuiDemo.Views
{
  public partial class LoginPage : ContentPage, IViewFor<LoginViewModel>
  {
    public LoginPage()
    {
      InitializeComponent();
      // We'll initialize our viewmodel
      ViewModel = new LoginViewModel();
      // We'll add the bindings
      this.Bind(ViewModel, vm => vm.Email, v => v.Email.Text);
      this.Bind(ViewModel, vm => vm.Password, v => v.Password.Text);
      this.BindCommand(ViewModel, vm => vm.Login, v => v.Login);
    }


    //The rest of the code below is plumbing:

    public static readonly BindableProperty ViewModelProperty = BindableProperty.Create(nameof(ViewModel), typeof(LoginViewModel), typeof(LoginPage), null, BindingMode.OneWay);

    public LoginViewModel ViewModel
    {
      get { return (LoginViewModel)GetValue(ViewModelProperty); }
      set { SetValue(ViewModelProperty, value); }
    }

    object IViewFor.ViewModel
    {
      get { return ViewModel; }
      set { ViewModel = (LoginViewModel)value; }
    }
  }
}
Before we can start the project we need to add some code to our ViewModel.
- Our ViewModel needs to inherit from ReactiveObject.
- We’ll add a ReactiveCommand (which is an implementation of the ICommand used in MVVM) for our button Login.
- We’ll add two properties for Email and Password. For the INotifyPropertyChanged implementation ReactiveUI gives us the RaiseAndSetIfChanged.
- We’ll add another property that will give us an idea when the login action is happening and when the action is done. This is not a property we want to set from our View. It’s a “read-only” calculated property that can only be set by the LoginViewModel.
using System;
using System.Threading.Tasks;
using ReactiveUI;

namespace DevProtocol.Xam.RuiDemo.ViewModels
{
  public class LoginViewModel: ReactiveObject
  {
    public ReactiveCommand<System.Reactive.Unit> Login { get; protected set; }

    string _email;
    public string Email
    {
      get { return _email; }
      set { this.RaiseAndSetIfChanged(ref _email, value); }
    }

    string _password;
    public string Password
    {
      get { return _password; }
      set { this.RaiseAndSetIfChanged(ref _password, value); }
    }

    readonly ObservableAsPropertyHelper<bool> _isLoading;
    public bool IsLoading
    {
      get { return _isLoading.Value; }
    }
  }
}
Now you can start the app and look if you have errors. The app however still doesn’t react to anything. First we’ll add an observable so we can verify if we can click on the Login button or not. So we need an observable that changes when
- Email contains a valid email address
- Password is not empty
In the constructor of the LoginViewModel we add:
var canLogin = this.WhenAnyValue(
  x => x.Email,
  x => x.Password,
  (em, pa) =>
  {
    return !String.IsNullOrWhiteSpace(em) &&
    // regex to check valid email
    Regex.IsMatch(em,
    @"^(?("")("".+?(?<!\\)""@)|(([0-9a-z]((\.(?!\.))|[-!#\$%&'\*\+/=\?\^`\{\}\|~\w])*)(?<=[0-9a-z])@))" +
    @"(?(\[)(\[(\d{1,3}\.){3}\d{1,3}\])|(([0-9a-z][-\w]*[0-9a-z]*\.)+[a-z0-9][\-a-z0-9]{0,22}[a-z0-9]))$", RegexOptions.IgnoreCase, TimeSpan.FromMilliseconds(250)) &&
    // check if password not empty
    !String.IsNullOrWhiteSpace(pa);
});
Now our ReactiveCommand for the Login button can observe the canLogin to enable/disable the button. When the button is clicked we’ll execute an async Task. So in the constructor of our ViewModel we add:
Login = ReactiveCommand.CreateAsyncTask(canLogin, async (arg) =>
{
  await Task.Delay(4000).ConfigureAwait(false);
});
Next we hook our ObservableAsPropertyHelper IsLoading to the ReactiveCommand so the property changes when the Login action is executing. In the constructor of our ViewModel we add:
Login.IsExecuting.ToProperty(this, x => x.IsLoading, out _isLoading);
Finally our View needs to enable and disable the Email textbox,Password textbox and Loading Label based on the IsLoading property. After the bindings in our LoginPage constructor we add:
this.WhenAnyValue(x => x.ViewModel.IsLoading)
.ObserveOn(RxApp.MainThreadScheduler)
.Subscribe(busy =>
{
  Email.IsEnabled = !busy;
  Password.IsEnabled = !busy;
  Loading.IsVisible = busy;
});
That’s it, run your Xamarin Forms ReactiveUI application and test it out.
Download
Download the code from my Github
Next steps
- Create a generic ReactiveContentPage so you don’t have to implement the boilerplate code for each Page.
- Dispose your bindings and observables.
- A newer post is available on https://www.devprotocol.com/reactiveui-tutorial-for-xamarin-the-viewmodel/